Imagine offering a secure and convenient checkout experience, where your customers can make payments with just one tap. With Apple Pay integrated into your Magento 2 store, you can provide a safe, lightning-fast, and effortless customer experience throughout their buying journey.
How can you get this started?
The simplest way is to configure Apple Pay in your Magento 2 store using Braintree. With Braintree integration, you can provide a faster and reliable checkout process for every customer.
In this blog, we’ll explore how to integrate it seamlessly into your Magento 2 store for seamless transactions and grow your business.
Why do you need to configure Apple Pay via Braintree in Magento 2?
Integrating Apple Pay into your Magento 2 store through Braintree helps maximize conversions by enabling a streamlined, one-click checkout experience that allows for maximum conversions.
Additionally, Apple Pay’s global adoption and Braintree’s seamless integration open your store to Apple’s vast customer base, which is widely adopted and available across regions. This means you’re not just offering a better checkout—you’re expanding your market and reaching more high-intent buyers worldwide.
Benefits Of Integrating It Via Braintree:
Seamless Integration:
Braintree offers comprehensive development tools and APIs, making it easy to integrate Apple Pay and customize its payment functionality within your Magento 2 store.

Faster Transactions:
Apple Pay enables a one-tap checkout experience, leading to shorter customer queues and potentially encouraging repeat visits.
Advanced Security:

Apple Pay ensures secure transactions using biometric authentication and tokenization features to safeguard customer data at every step. With Braintree’s built-in data protection tools, your Magento 2 store gets a robust security setup, enabling your business and customers to stay safe from potential threats.
Global Accessibility-
According to a statement made by Apple itself, “ Apple Pay is accepted at over 85 percent of retailers in the U.S,” allowing you to accept payments in multiple currencies and effortlessly process international transactions within your Magento 2 store.
Easy Checkout Process
Integrating via Braintree reduces the chances of entering the details manually, leading to an easy checkout process. This blend of speed and simplicity results in fewer abandoned carts and higher customer satisfaction.
How to Set Up Apple Pay Integration in Magento 2 using Braintree
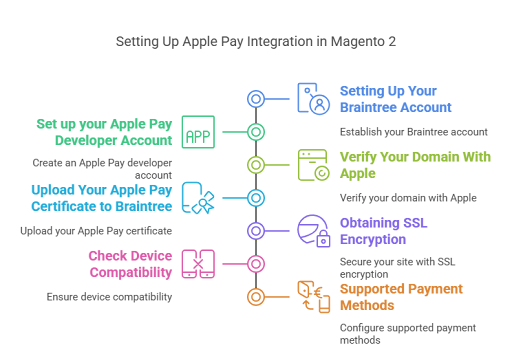
1. Setting Up Your Braintree Account
To get started, you’ll need to create an account with Braintree, as it provides an easy-to-use interface for managing transactions, setting up payment methods, and enabling seamless integration with your Magento 2 platform.

2. Set up your Apple Pay Developer Account
After setting up your Braintree account, your next question is: How do I enable Apple Pay in Magento 2?
To do this, you need to set up an Apple Developer Account, as it permits you to set up your Merchant ID, generate a payment processing certificate, and create the API credentials for the secure integration of Apple Pay with Braintree.
3. Verify Your Domain With Apple
Apple requires domain verification before enabling Apple Pay for your store. For instance, you need to download a verification file and copy this path into your Magento 2 root directory: Once completed, you must confirm the domain in your Apple Developer account to complete the verification process.
.well-known/apple-developer-merchantid-domain-association4. Upload Your Apple Pay Certificate to Braintree
After creating your Apple Pay certificate, the next step is to upload it to your Braintree account, making it essential to process every Apple Pay transaction.
5. Obtaining SSL Encryption
You must obtain an SSL encryption for your Magento 2 store before integrating Apple Pay.
Why This Matters?
Without SSL, Apple Pay will fail to initialize the user, and the Braintree gateway will automatically reject the payment request. In such a case, you need a proper SSL setup method between your Magento and Braintree payment methods.
6. Check Device Compatibility
Before going live, testing your Magento 2 store’s Apple Pay integration on supported Apple devices is essential to ensure the payment method is compatible with your target audience.
For example, Apple Pay is supported by Safari; ensure that your Magento 2 store is optimized for Safari to enable Apple Pay integration.
7. Supported Payment Methods
Apple Pay works with most major card networks, including Visa, MasterCard, American Express, and Discover. You must ensure that your Braintree supports these to accept Apple Pay transactions securely without requiring any additional setup.

How to Set Up Your Apple Pay with Braintree in Magento 2
Before going for your final configuration, it is essential to know that Braintree integration differs slightly depending on the Magento Version of your site.
For instance, if you’re using Magento 2.3. x and below
Then, your Braintree module is natively integrated into Magento.
To enable it:
Go to Stores → Configuration → Sales → Payment Methods → Braintree.
This version supports,
-Credit/debit cards
-PayPal via Braintree
-Vault for saved cards
-3D Secure, and more.
If you’re using Magento 2.4. x and above
– Magento will be removing your default Braintree Integration starting from version 2.4.0.
– To keep using it, install the official Braintree module provided by PayPal.
– You can choose it either from the Magento Marketplace or by using Composer by running the following command:
composer require paypal/paypal-braintree-magento
bin/magento module:enable PayPal_Braintree
bin/magento setup:upgrade
– Once installed, you can use your Braintree as before, but just with its standalone module.
After completing these key setups, you can move on to the final configuration for setting up Apple Pay.
Final Configuration: Setting Up Your Apple Pay With Braintree In Magento 2
Once the Braintree module is set up, it’s time to configure Apple Pay in your Magento 2 store by following these simple steps:
1. Go to Stores > Settings > Configuration > Sales > Payment Methods.
2. Open the Braintree section and locate Apple Pay Settings.
3. Enable Apple Pay and enter your Merchant ID (available from your Apple Developer Account).
4. Adjust other settings such as:
Title and Sort Order (Website).
Customer billing address requirement.
Allowed countries for Apple Pay.
Following this final configuration, you can seamlessly make your Magento 2 store accept Apple Pay payments via the Braintree integration.

Troubleshooting Common Issues
While configuring Apple Pay via Braintree in Magento 2, there is a chance of some common issues.
Apple Pay Not Showing At Checkout
One of the most common issues users face during their purchase journey is that Apple Pay does not show up at checkout due to missing domain verification or improper SSL setup.
You can mitigate this issue by ensuring that your Apple verification file is uploaded to the .well-known directory and your site runs on HTTPS.
Not Completing Transactions
Even with a smooth setup, the Apple Pay button may appear but not complete transactions. To overcome this, double-check your Merchant ID in your Apple Developer account and re-upload valid certificates to Braintree for a smoother checkout.
Transactions Not Showing in Braintree
Sometimes, the transaction doesn’t appear in your Braintree dashboard even after a customer completes checkout. This usually happens due to misconfigured API credentials or a missing webhook setup.
To capture real-time transaction data, you must double-check that your Braintree API keys and webhook URL are configured correctly in your Braintree account.
Conclusion
Integrating Apple Pay through Braintree boosts convenience and security for your Magento 2 store. However, with the proper setup, you can offer a seamless, one-click checkout experience and enhance customer satisfaction. This leads to the overall success of your e-commerce store with smoother, faster payments.
At Digital Radium, we make it easy for you! As your trusted Magento development company in St.Louis, we’ll handle the expert maintenance and set up Apple Pay for your store for a frictionless checkout experience.